Automated Cloud Hosting Using AWS, Terraform and GitHub Actions
Stop manually uploading files to S3. In this lab, we build an Automated Pipeline. Terraform architects a secure "Private" bucket fronted by CloudFront for global speed, while GitHub Actions teleports your code the moment you push it. This is a total Win for your automated workflows.
Architecture Overview
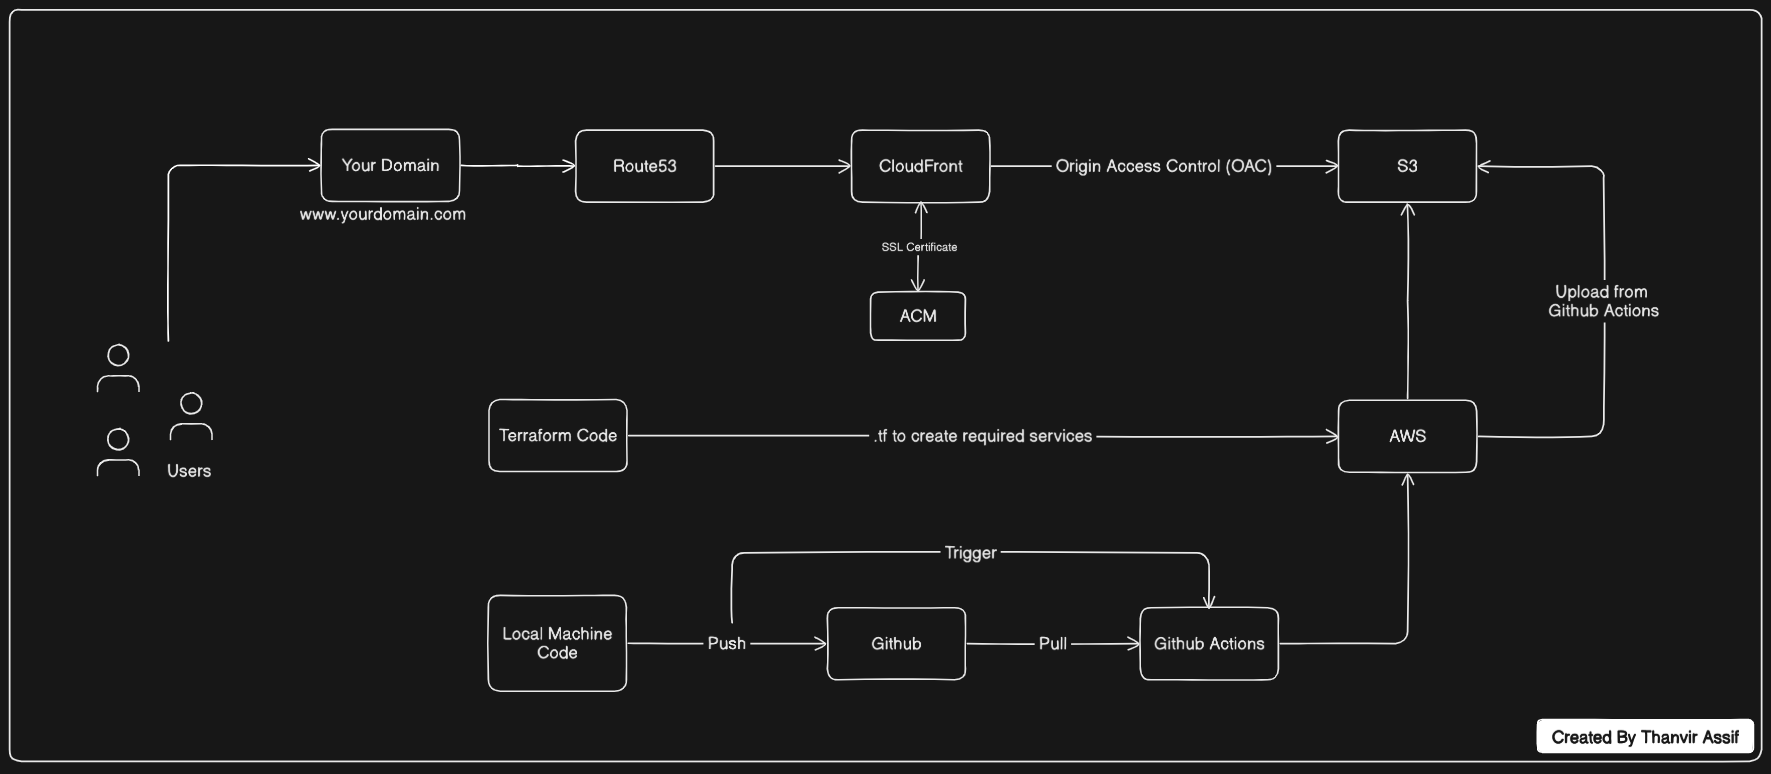
The Architecture (The Flow)
Understanding the data flow is key to mastering DevOps. This architecture ensures your code moves securely from your local machine to a global audience without any manual intervention.
Step 1: Code Push
The journey begins when you push your code updates to the GitHub main branch.
Step 2: Automation (GitHub Actions)
GitHub Actions detects the push, assumes your IAM credentials, and automatically syncs the new files to S3.
Step 3: Secure Storage (S3)
Your files are stored in Amazon S3. Public access is disabled, keeping your origin safe from direct internet exposure.
Step 4: Distribution (CloudFront)
CloudFront acts as the "Security Guard," pulling files from S3 and serving them globally via HTTPS.
Step 5: DNS Management (Route 53)
Route 53 points your professional custom domain (thanvirassif.com) directly to the CloudFront network.
0 Required Prerequisites
Terraform
Infrastructure as Code
GitHub Repo
For Your Website Code
AWS Account
With Route 53 Zone
IAM Access
Admin Permissions
1 Infrastructure Blueprint (`main.tf`)
This builds the S3 Bucket (Private), CloudFront with OAC, and Route 53 Records. No manual clicks required!
# ---Configure the AWS provider---
provider "aws" {
  region = "ap-south-1"
}

provider "aws" {
  alias  = "us_east_1"
  region = "us-east-1"
}


# ---DNS and SSL (Route 53 & ACM)---
data "aws_route53_zone" "main" {
  name = "youdomain.com"
}

resource "aws_acm_certificate" "cert" {
  provider          = aws.us_east_1
  domain_name       = "www.youdomain.com"
  validation_method = "DNS"

  lifecycle {
    create_before_destroy = true
  }
}

resource "aws_route53_record" "cert_validation" {
  for_each = {
    for dvo in aws_acm_certificate.cert.domain_validation_options : dvo.domain_name => {
      name   = dvo.resource_record_name
      record = dvo.resource_record_value
      type   = dvo.resource_record_type
    }
  }

  allow_overwrite = true
  name            = each.value.name
  records         = [each.value.record]
  ttl             = 60
  type            = each.value.type
  zone_id         = data.aws_route53_zone.main.zone_id
}

# This tells Terraform: "Wait until the certificate is actually issued before moving on"
resource "aws_acm_certificate_validation" "cert" {
  provider                = aws.us_east_1
  certificate_arn         = aws_acm_certificate.cert.arn
  validation_record_fqdns = [for record in aws_route53_record.cert_validation : record.fqdn]
}


# ---S3 Bucket for Static Website Hosting---
resource "aws_s3_bucket" "website_bucket" {
  bucket = "www.yourdomain.com"
}

resource "aws_s3_bucket_public_access_block" "block_public" {
  bucket = aws_s3_bucket.website_bucket.id

  block_public_acls       = true
  block_public_policy     = true
  ignore_public_acls      = true
  restrict_public_buckets = true
}


# ---CloudFront with OAC (Origin Access Control)---
# Create the OAC
resource "aws_cloudfront_origin_access_control" "oac" {
  name                              = "s3-oac-test-site"
  origin_access_control_origin_type = "s3"
  signing_behavior                  = "always"
  signing_protocol                  = "sigv4"
}

resource "aws_cloudfront_distribution" "distro" {
  origin {
    domain_name              = aws_s3_bucket.website_bucket.bucket_regional_domain_name
    origin_id                = "S3Origin"
    origin_access_control_id = aws_cloudfront_origin_access_control.oac.id
  }

  enabled             = true
  default_root_object = "index.html"
  aliases             = ["www.yourdomain.com"]

  default_cache_behavior {
    allowed_methods        = ["GET", "HEAD"]
    cached_methods         = ["GET", "HEAD"]
    target_origin_id       = "S3Origin"
    viewer_protocol_policy = "redirect-to-https"

    forwarded_values {
      query_string = false
      cookies { forward = "none" }
    }
  }

  viewer_certificate {
    acm_certificate_arn      = aws_acm_certificate_validation.cert.certificate_arn
    ssl_support_method       = "sni-only"
    minimum_protocol_version = "TLSv1.2_2021"
  }

  restrictions {
    geo_restriction { restriction_type = "none" }
  }
}


# ---(Final) IAM Role and Policy for CloudFront OAC---
# Allow CloudFront to access S3
resource "aws_s3_bucket_policy" "allow_cloudfront" {
  bucket = aws_s3_bucket.website_bucket.id
  policy = jsonencode({
    Version = "2012-10-17"
    Statement = [
      {
        Sid       = "AllowCloudFrontServicePrincipalReadOnly"
        Effect    = "Allow"
        Principal = { Service = "cloudfront.amazonaws.com" }
        Action    = "s3:GetObject"
        Resource  = "${aws_s3_bucket.website_bucket.arn}/*"
        Condition = {
          StringEquals = {
            "AWS:SourceArn" = aws_cloudfront_distribution.distro.arn
          }
        }
      }
    ]
  })
}

# Route 53 Alias Record
resource "aws_route53_record" "www" {
  zone_id = data.aws_route53_zone.main.zone_id
  name    = "www.yourdomain.com"
  type    = "A"

  alias {
    name                   = aws_cloudfront_distribution.distro.domain_name
    zone_id                = aws_cloudfront_distribution.distro.hosted_zone_id
    evaluate_target_health = false
  }
}

output "s3_bucket_name" {
  value = aws_s3_bucket.website_bucket.id
}

output "cloudfront_distribution_id" {
  value = aws_cloudfront_distribution.distro.id
}

output "website_url" {
  value = "https://www.yourdomain.com"
}
2 IAM Least Privilege (`iam.tf`)
Security first. We create a dedicated user for GitHub that can only touch your specific bucket and clear the cache. No cap, this is how pros do it.
# --- 1. AWS Provider Configuration --- Provider is already defined in main.tf, so we don't need to repeat it here. Just make sure to run `terraform init` in the root directory to set everything up before applying this IAM configuration.
# --- 2. Create the IAM User ---
# This is the "Identity" that GitHub Actions will use to log in.
resource "aws_iam_user" "github_actions" {
  name = "github-actions-auto-cloud-deploy"
  tags = {
    Project = "AutoCloudDeploy"
    Owner   = "yourname"
  }
}


# --- 3. Define the Least Privilege Policy ---
# We are only giving GitHub permission to touch what it absolutely needs.
resource "aws_iam_policy" "deploy_policy" {
  name        = "GitHubActionsDeployPolicy"
  description = "Allows S3 sync and CloudFront invalidation for the test subdomain"

  policy = jsonencode({
    Version = "2012-10-17"
    Statement = [
      {
        # Permission: Manage files in the specific S3 bucket
        Effect = "Allow"
        Action = [
          "s3:PutObject",
          "s3:ListBucket",
          "s3:DeleteObject",
          "s3:GetBucketLocation"
        ]
        Resource = [
          "${aws_s3_bucket.website_bucket.arn}",
          "${aws_s3_bucket.website_bucket.arn}/*"
        ]
      },
      {
        # Permission: Tell CloudFront to refresh its cache
        Effect = "Allow"
        Action = [
          "cloudfront:CreateInvalidation"
        ]
        Resource = [
          "${aws_cloudfront_distribution.distro.arn}"
        ]
      }
    ]
  })
}


# --- 4. Attach Policy to User ---
# This links the "locked door" (the policy) to the "key holder" (the user).
resource "aws_iam_user_policy_attachment" "attach_deploy" {
  user       = aws_iam_user.github_actions.name
  policy_arn = aws_iam_policy.deploy_policy.arn
}


# --- 5. Create Access Keys ---
# This generates the credentials you will paste into GitHub Secrets.
resource "aws_iam_access_key" "github_keys" {
  user = aws_iam_user.github_actions.name
}


# --- 6. Outputs (The "The Goods") ---
# These are sensitive. Terraform won't show them unless you specifically ask.
output "github_actions_access_key" {
  value     = aws_iam_access_key.github_keys.id
  sensitive = true
}

output "github_actions_secret_key" {
  value     = aws_iam_access_key.github_keys.secret
  sensitive = true
}
3 Critical: Link GitHub to AWS
Run terraform apply first, then grab your
secrets from the terminal. Go to your GitHub Repo -> Settings -> Secrets ->
Actions and add these:
- AWS_ACCESS_KEY_ID
- AWS_SECRET_ACCESS_KEY
- DIST_ID (CloudFront ID)
4 The Robot (`deploy.yml`)
Save this in .github/workflows/. It wakes up on every
push to main and syncs your files.
name: Auto Cloud Deploy

on:
  push:
    branches: [ main ]

jobs:
  deploy:
    runs-on: ubuntu-latest
    steps:
      - uses: actions/checkout@v4

      - name: Configure AWS
        uses: aws-actions/configure-aws-credentials@v4
        with:
          aws-access-key-id: ${{ secrets.AWS_ACCESS_KEY_ID }}
          aws-secret-access-key: ${{ secrets.AWS_SECRET_ACCESS_KEY }}
          aws-region: ap-south-1

      - name: Sync to S3
        run: aws s3 sync . s3://your-bucket-name --delete --exclude ".git/*" --exclude "*.tf"

      - name: Refresh Cache
        run: aws cloudfront create-invalidation --distribution-id ${{ secrets.DIST_ID }} --paths "/*"
The Terraform Command Launch
Now that your main.tf and iam.tf are ready, it's time to talk to the
AWS cloud. Open your terminal in the project folder and follow these exact steps to deploy the
"SkySync Pro" engine.
1. Initialize Terraform
This command downloads the AWS providers and prepares your working directory.
terraform init2. Verify the Plan
Always check what you're building. This shows you the 12+ resources being created.
terraform plan3. Execute & Build
The moment of truth. Type yes when prompted to start the build.
terraform apply4. Export Secret Keys
Since your Secret Key is marked as sensitive, use this command to view it for GitHub Secrets.
terraform output -raw secret_keyCritical Notes & Security Checklist
Note 1: IAM Least Privilege (MNC Standard)
Never use your "Root" AWS credentials in GitHub. Always use a
dedicated IAM user with only the specific permissions defined in our
iam.tf. Following the Principle of Least Privilege is a
non-negotiable requirement for Indian MNCs like Amazon
and Other reputable companies.
Note 2: SSL Certification
CloudFront is picky-it requires all SSL certificates to be created in the
us-east-1 (N. Virginia) region. Our Terraform code handles this
automatically using the aws.us_east_1 provider alias.
Note 3: Private vs Public
Your S3 bucket is 100% Private. Secure access is granted only to CloudFront via the Origin Access Control (OAC) policy. Do not change the S3 public access settings or you'll break the security chain!
Note 4: The Cleanup (Deletion)
Since we added force_destroy = true in the
main.tf, Terraform will automatically empty the bucket before
deleting it. This ensures you aren't charged for resources after you finish
testing.
terraform destroy
5 Cleanup Protocol
Avoid the Surprise Bill
Once your students are done testing, run terraform destroy. Because we added
force_destroy = true, Terraform will wipe the bucket and all files inside
automatically.
🎉 Pipeline Fully Operational!
You've successfully bridged GitHub, Terraform, and AWS into a seamless flow. Big flex!
Check your website out using your domain name.